Making clean pumpkin cuts
A drawn triangle should leave a clean corner and a plug that can come out. Convex shapes, cutting planes and careful surface data help turn a sketch into a solid cut.
This series · Part 2 of 5Drop Dead Gourdgeous
- Drop Dead Gourdgeous
- Making clean pumpkin cuts
- Scraping pumpkins
- Meshes, heightfields and volumes
- Building a candle maker
An outline needs a wall behind it.
Drawing a triangle on a pumpkin is easy to picture. Making the hole is more demanding: the line has to become a solid cutting tool, the opening needs real walls, and the piece inside has to fit on its way out. A clean silhouette on the front can still hide broken corners or a trapped plug.
In Drop Dead Gourdgeous, we subtract a three-dimensional cutter from the pumpkin shell with Manifold, a solid-modelling library. Intersecting a slightly smaller cutter with that same shell makes the matching removable piece. The useful question is which shape of cutter preserves the outline through the wall.
This article follows the cutter and the surface it leaves. Closing an imperfect drawn loop is an earlier step: even a tidy, closed outline still needs a valid solid cut.
A convex shape has no inward bite.
Pick any two points inside a filled triangle and join them with a straight line. The whole line stays inside the triangle. That is what convex means. Circles and filled rectangles pass the same test; the points do not have to sit on the outline.
Now try a crescent or a shape with a notch. Two points can lie inside it while the straight line between them crosses the missing bite. That shape is concave. The distinction matters because a straight-edged convex outline can be described by keeping the inside side of each straight boundary. Doing that to a notched outline would cut across the notch and change the drawing.
Convex: the line stays inside
A and B are inside the filled shape. The whole segment between them is inside too.
Concave: the line crosses a gap
Both points are still inside. The dashed part crosses the notch, outside the material.
Let the walls meet along real edges.
For a suitable convex outline, the cutter is built from planes: flat boundaries extended through the pumpkin wall. Keeping the inside side of all those planes gives one solid. Where two walls meet, their join is an explicit edge in the cutter. The triangle’s corner can continue through the flesh instead of being approximated by triangles crossing that join.
The current app uses this path for suitable convex outlines. It also accepts nearly convex outlines after straightening small inward bows within a measured tolerance. That is a bounded correction, not permission to replace a deliberate notch with its convex outline.
Concave shapes, roughened edges and cases outside those limits use a sampled field. Its values distinguish inside from outside the cutter; a surface is built at their boundary. This path can describe shapes the plane-based path does not accept, but its grid also limits the detail it can retain.
The two paths serve the same job. Choosing planes for an eligible outline preserves its sharp wall joins; choosing the sampled path keeps the wider range of freehand shapes and deliberately irregular edges available.
Keep the inside of each wall
Each straight boundary keeps one side. Their shared region is the triangle.
Cap the front and back
The pale triangle is the front cap; the dashed edge belongs to the rear cap. Both stop the cutter’s depth.
The plug needs a way out.
Draft is the inward cut angle; kerf is the gap left by the blade. Both affect whether the plug can leave. We check overlap at five points along its pull path. That catches trapped pieces, though it cannot prove clearance between every sampled position.
Subtracting one cutter and keeping the slightly smaller plug leaves that clearance in the geometry. The inward angle changes both the front and rear opening. A steeper cut can leave a front outline looking open while the gap behind it narrows or closes, so front-view appearance alone cannot judge whether the piece is removable.
The pupil-and-bridge study tests another constraint: the pumpkin left behind must remain connected. A clear pull path for the removed piece does not prove that a narrow bridge is strong or that it will transmit enough light.
Fix the corner in the geometry.
The repeated fins came from triangles crossing the joins between cutter walls. Adding explicit corner edges removed those wedges in this convex test. We kept the outline, angle, blade gap, material and light fixed.
These are matched historical lab captures, not a fresh rendering of the current app. They isolate the cutter change: the narrow wedges disappear along the inner corner, while the flat flesh shading remains visible. That makes the comparison useful without treating every part of the image as a finished material result.
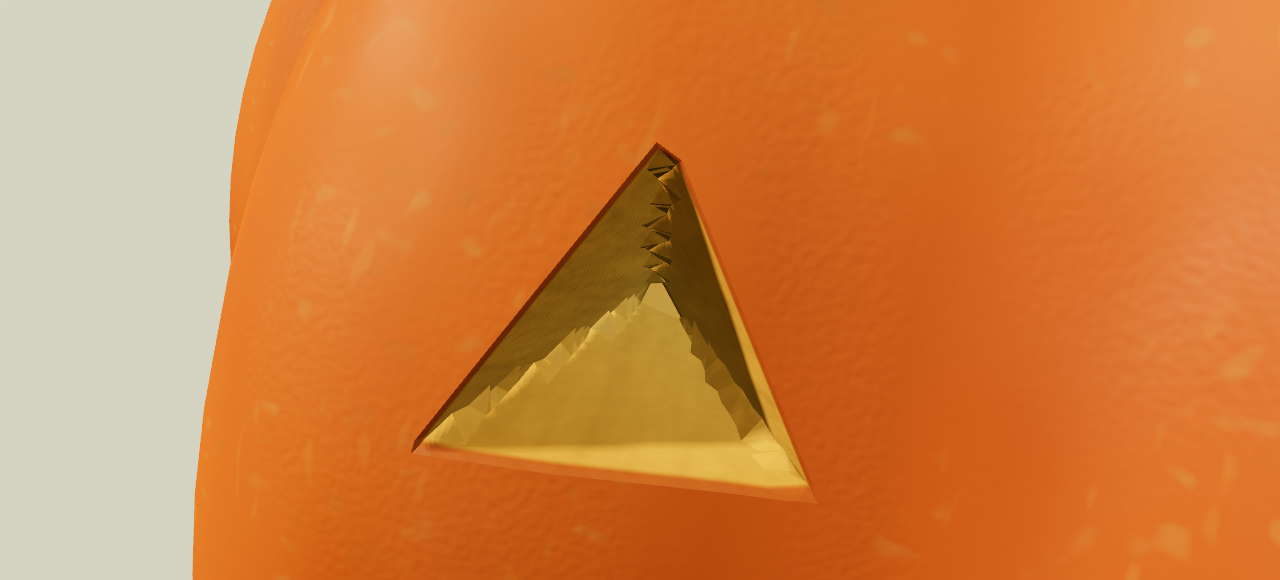
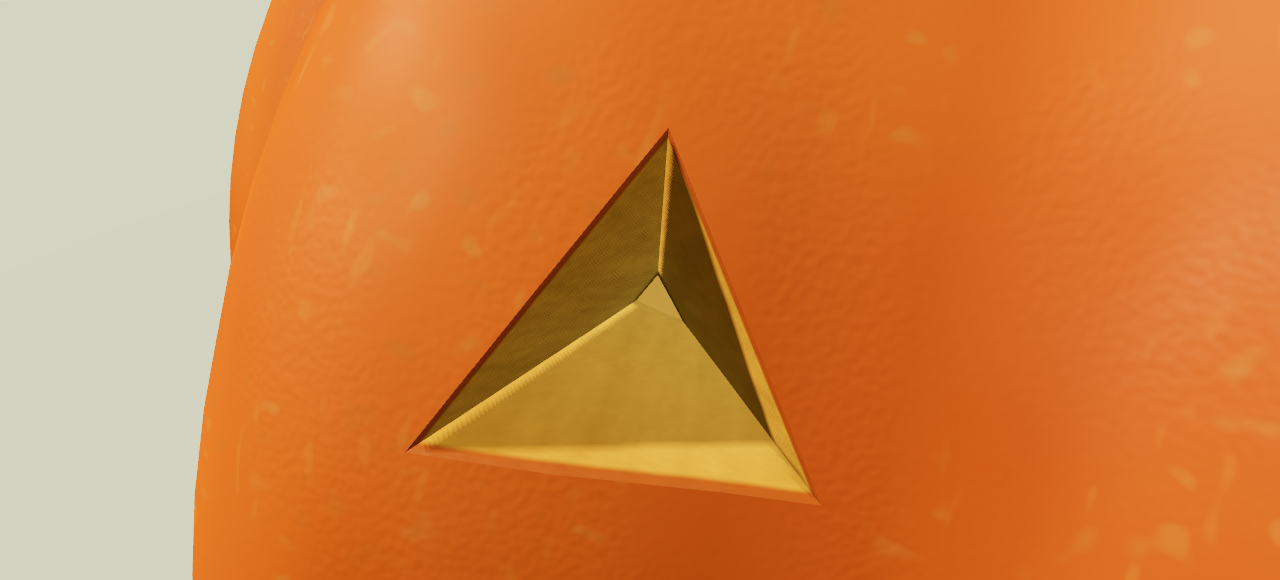
The correction held up in clay view, pull-clearance checks and saved-cut replay. Old cuts keep their geometry version, so updating the cutter does not change work someone has already saved.
New triangles need more than a position.
A newly exposed wall also needs to know where skin ends and deeper material begins. The worker samples the actual outer, skin-base and cavity triangles. It interpolates values between their corners, then extends the layer information between the paired surfaces. That supplies texture coordinates, depth and thickness for the new wall.
Those values let the shader distinguish orange skin from exposed flesh and read the wall’s remaining thickness. Without them, a geometrically correct new face could carry the wrong layer, lose its texture or respond to light as though it belonged somewhere else on the pumpkin.
A later cut can cross a patch we have already scraped. When we pack that prepared mesh, we share a vertex record only when all its surface data agrees. Two records can occupy the same geometric point while keeping different texture or shading values. The solid operation can know their edges meet without erasing that seam.
This separation between a geometric connection and a vertex’s surface data follows Manifold’s mesh-property model. The pumpkin-specific work is carrying the right layer information through each cut.
Smooth walls, sharp corners.
Wall shape and wall shading needed separate treatment. A normal is the direction used to light a surface. Giving every triangle its own normal made rounded cut walls look striped. The current renderer averages normals across shallow joins and keeps a crease where the direction changes sharply. The geometry stays put: a rounded lid can shade smoothly while its knife corners remain sharp.
Smoothing the light response cannot remove fins or wedges from the mesh. Those need the corner-geometry correction. Keeping the two jobs separate lets us ask the right question: is the wall actually broken, or is an intact surface being lit as a row of unrelated triangles? The older lab captures above still show unfinished shading.
The same distinction returns when we scrape rather than cut through a wall. Meshes, heightfields and volumes compares three ways to store a changing surface, and the shapes each one can represent.